ok, so i'm looking to paint my track plastics. how do these directions look?
i've read that after clearcoat, you should wetsand lightly with 1400 grit and wipe off with tack cloth.
some other questions i have is if you're buying regular paint at color rite, how much paint should i buy to paint the upper, lower, and tail with one color? i'm leaning toward going with 2 colors and clearcoat.
have you found any other good track plastics painting tutorials?
************************************************** *********
found this on
http://www.r6messagenet.com/
credit goes to csideblue
(disclaimer: i did this how-to on race bodywork, the same principals apply when painting stock ABS plastic. with that being said ... painting is not exact. it will vary greatly based on humidity, temp, and type of paint used. this how-to is simply a starting point. if you jack your shit up then your shit is jacked up). now let's get to painting
FYI: i did not use a paintbooth. i spray these in my backyard on a brisk, sunfilled, non-windy day.
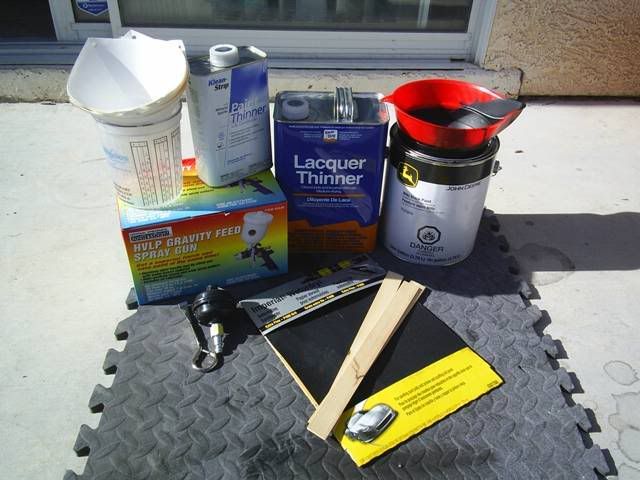
tools/supplies pictured: prices are approximated.
HVLP gravity feed spray gun / Harbor Freight item#: 43430 - $39.99
** water separator / $5.99
** paint stirrers / free
** paint strainers / free
** ratio cup / $1.99
** paint thinner / $3.50
400 grit sand paper / $3.99
lacquer thinner (for clean up only) / $6.99
paint. this paint is "Blitz Black", it can be bought at any John Deere supplier for approx $28/gallon. it dries to a matte finish. this is the same paint used on hot rods that have that flat, almost primered look. it's a single stage paint meaning no clear coat is required and no hardener is needed. most automotive paints need reducer and hardener added in correct ratio's. ask the people at the paint supply store.
** bought/stolen at paint supply store.
tools/supplies not pictured:
air compressor, 30ft air hose, and fittings
** tack cloth / $1.99
bucket
dish soap
prep bodywork:
race bodywork comes pre-primered, it may have imperfections too (ie: crack, chips, runs). if needed refer to my how-to on fiberglass repair ... Here.
sand:
fill a bucket with water and add a few drops of dish soap. use 400grit paper and sand until smooth. re-primer and re-sand if need be. rinse with water and let dry. use tack cloth to remove dirt and or dust.
air compressor:
fill compressor to about 60psi and open the valve underneath the tank to remove any condensation. the last thing you want is to have to start over because you have water in the lines. close valve, fill tank and set air regulator to 120psi.
mix paint:
pour paint into ratio cup and add correct amount of thinner to be added. i used about 3/4 quart for this job. this paint has a 10:1 ratio (10 parts paint, 1 part thinner). DO NOT use lacquer thinner with this paint, it will cause the paint to separate! stir paint thinner in slowly, about 2 mins.
setting up spray gun: paraphrased from Here because his explanation is way better than the shit i was writing
your set up should go: spray gun > air regulator > water separator > air hose > air compressor
set the fan width by turning out the material knob about 2 1/2 turns out from closed. this is the "mixture" adjustment, kind of like the idle screw on a carburetor. the farther in it is screwed the lower the fluid to air ratio is and the smaller the droplets will be. the farther out it is, the higher the fluid to air ratio is and the larger the droplets.
set the air pressure at the gun inlet to the manufacturer's specs, usually found on the gun, and is the maximum PSI it can have while still maintaining the maximum 10 lb at the cap for legal HVLP transfer efficiency (68%). You are now ready to do a test spray.
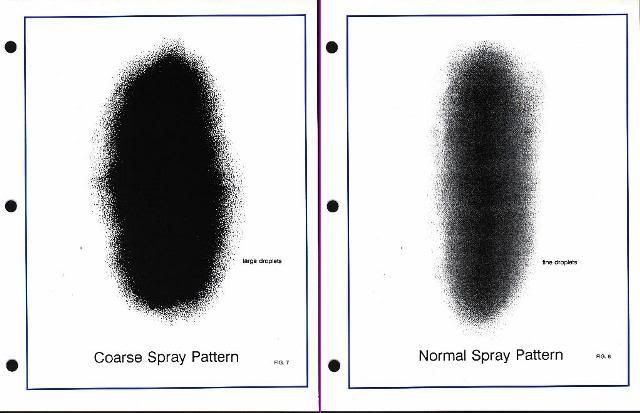
tape a piece of masking paper to the wall, hold the gun about 8-10 inches away and make a test pass. you should have a cigar shaped pattern with total coverage in the center with fading coverage going away from the center. there should be no runs. if you have runs, either you are holding the trigger too long, you are too close, or the gun is applying too much material, adjust either by screwing in the material knob or turning the air pressure down. my gun was 35psi.
turn in the material knob to make the droplets smaller (and or raise the air pressure). the balance you need to attain is the smallest droplet size possible before you lose the coverage desired. in other words, if you turn in the material knob too far, not enough material will be coming out to cover what you're painting.
it should look like the 2nd pic:
time to paint:
hang or mount pieces so that you can easily spray all area's. i made some stands outta some scrap wood. whatever works for you. wip down prepped piece with tack cloth to remove dirt/dust. spray long even coats to all areas and allow it to flash. for this application the flash time was about 30 mins. after that apply a 2nd coat, allow to flash again, then apply 3rd and final coat. since there's no clear coat needed for this job .... i'm done!
clean up:
use lacquer thinner to clean tools/supplies


 Threaded Mode