Washington Cycle Works

 
Go Back   Sportbike Addicts | Two Wheels... Our Drug of Choice > The Garage - Tech Talk > Mods & How To's
FAQ Members List Member Gallery Calendar Today's Posts Donate
Reply
 
Thread Tools Display Modes

painting track plastics
Old 01-29-2007, 09:30 PM   #1
ronin_01r1
Throttle Lock
 
ronin_01r1's Avatar
 
ronin_01r1 is offline
Join Date: Jun 2005
Location: south jersey
Posts: 1,105
Default painting track plastics

ok, so i'm looking to paint my track plastics. how do these directions look?

i've read that after clearcoat, you should wetsand lightly with 1400 grit and wipe off with tack cloth.

some other questions i have is if you're buying regular paint at color rite, how much paint should i buy to paint the upper, lower, and tail with one color? i'm leaning toward going with 2 colors and clearcoat.

have you found any other good track plastics painting tutorials?


************************************************** *********

found this on http://www.r6messagenet.com/
credit goes to csideblue

(disclaimer: i did this how-to on race bodywork, the same principals apply when painting stock ABS plastic. with that being said ... painting is not exact. it will vary greatly based on humidity, temp, and type of paint used. this how-to is simply a starting point. if you jack your shit up then your shit is jacked up). now let's get to painting

FYI: i did not use a paintbooth. i spray these in my backyard on a brisk, sunfilled, non-windy day.
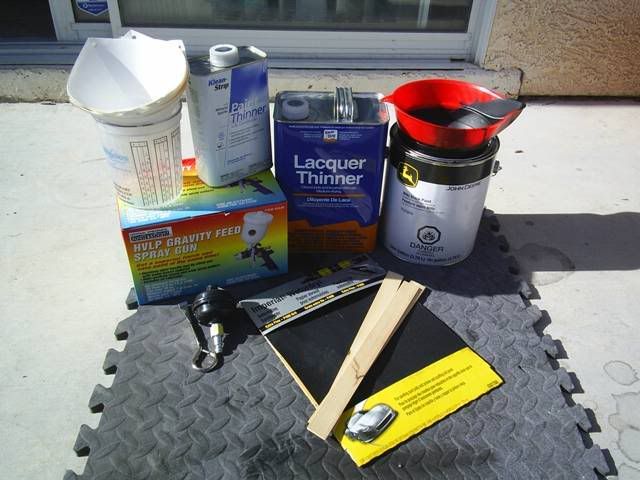


tools/supplies pictured: prices are approximated.
HVLP gravity feed spray gun / Harbor Freight item#: 43430 - $39.99
** water separator / $5.99
** paint stirrers / free
** paint strainers / free
** ratio cup / $1.99
** paint thinner / $3.50
400 grit sand paper / $3.99
lacquer thinner (for clean up only) / $6.99
paint. this paint is "Blitz Black", it can be bought at any John Deere supplier for approx $28/gallon. it dries to a matte finish. this is the same paint used on hot rods that have that flat, almost primered look. it's a single stage paint meaning no clear coat is required and no hardener is needed. most automotive paints need reducer and hardener added in correct ratio's. ask the people at the paint supply store.

** bought/stolen at paint supply store.

tools/supplies not pictured:
air compressor, 30ft air hose, and fittings
** tack cloth / $1.99
bucket
dish soap

prep bodywork:
race bodywork comes pre-primered, it may have imperfections too (ie: crack, chips, runs). if needed refer to my how-to on fiberglass repair ... Here.

sand:
fill a bucket with water and add a few drops of dish soap. use 400grit paper and sand until smooth. re-primer and re-sand if need be. rinse with water and let dry. use tack cloth to remove dirt and or dust.

air compressor:
fill compressor to about 60psi and open the valve underneath the tank to remove any condensation. the last thing you want is to have to start over because you have water in the lines. close valve, fill tank and set air regulator to 120psi.

mix paint:
pour paint into ratio cup and add correct amount of thinner to be added. i used about 3/4 quart for this job. this paint has a 10:1 ratio (10 parts paint, 1 part thinner). DO NOT use lacquer thinner with this paint, it will cause the paint to separate! stir paint thinner in slowly, about 2 mins.

setting up spray gun: paraphrased from Here because his explanation is way better than the shit i was writing

your set up should go: spray gun > air regulator > water separator > air hose > air compressor

set the fan width by turning out the material knob about 2 1/2 turns out from closed. this is the "mixture" adjustment, kind of like the idle screw on a carburetor. the farther in it is screwed the lower the fluid to air ratio is and the smaller the droplets will be. the farther out it is, the higher the fluid to air ratio is and the larger the droplets.

set the air pressure at the gun inlet to the manufacturer's specs, usually found on the gun, and is the maximum PSI it can have while still maintaining the maximum 10 lb at the cap for legal HVLP transfer efficiency (68%). You are now ready to do a test spray.

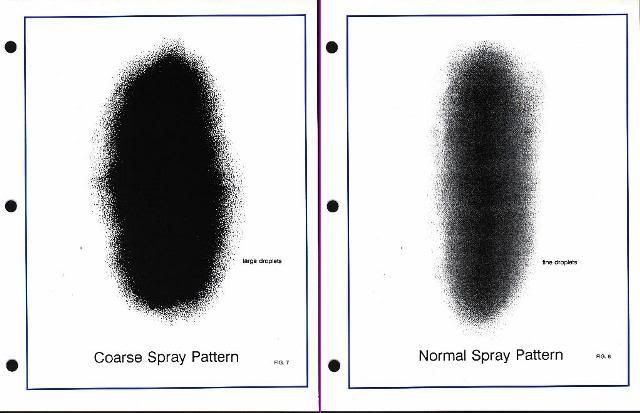
tape a piece of masking paper to the wall, hold the gun about 8-10 inches away and make a test pass. you should have a cigar shaped pattern with total coverage in the center with fading coverage going away from the center. there should be no runs. if you have runs, either you are holding the trigger too long, you are too close, or the gun is applying too much material, adjust either by screwing in the material knob or turning the air pressure down. my gun was 35psi.

turn in the material knob to make the droplets smaller (and or raise the air pressure). the balance you need to attain is the smallest droplet size possible before you lose the coverage desired. in other words, if you turn in the material knob too far, not enough material will be coming out to cover what you're painting.

it should look like the 2nd pic:

time to paint:
hang or mount pieces so that you can easily spray all area's. i made some stands outta some scrap wood. whatever works for you. wip down prepped piece with tack cloth to remove dirt/dust. spray long even coats to all areas and allow it to flash. for this application the flash time was about 30 mins. after that apply a 2nd coat, allow to flash again, then apply 3rd and final coat. since there's no clear coat needed for this job .... i'm done!

clean up:
use lacquer thinner to clean tools/supplies
__________________
SONG

2007 Kymco Grand Vista 250
2006 KTM 950 Supermoto
2001 Yamaha R1
1976 Honda CB360t
  Reply With Quote

Old 01-29-2007, 09:40 PM   #2
NYCSTRIPES
Meatball's Daddy
 
NYCSTRIPES's Avatar
 
NYCSTRIPES is offline
Join Date: Oct 2005
Location: Queens, NY
Posts: 1,754
Default

Quantity of paint really depends upon a couple of factors.
a) preparation of the paint surface
b) how well the sub surrface is primed, how well the color coat covers the primer coat.
c) skill of the painter
d) how many coats you can get the work surface coated in/type of oaint.

You are on the right track, I used to pain for a living and tinker around with painting track plastics. You can call if you like and I would be glad to explain the process for you.
Regardless what you do, since its a track bike, get some extra painy in case you need to do some touch up work later on.
Clear coat can also be included in the color coat to save you a step. I can also explain the advantages/disadvantages of each to you.
Drop me a PM with a contact method.
Ken
__________________
2003 TL1000R #489
1998 Valkyrie cruiser

No man's life, liberty, or property are safe while the legislature is in session....-Mark Twain
  Reply With Quote

Old 01-29-2007, 09:43 PM   #3
ronin_01r1
Throttle Lock
 
ronin_01r1's Avatar
 
ronin_01r1 is offline
Join Date: Jun 2005
Location: south jersey
Posts: 1,105
Default

Quote:
Originally Posted by NYCSTRIPES View Post
Quantity of paint really depends upon a couple of factors.
a) preparation of the paint surface
b) how well the sub surrface is primed, how well the color coat covers the primer coat.
c) skill of the painter
d) how many coats you can get the work surface coated in/type of oaint.

You are on the right track, I used to pain for a living and tinker around with painting track plastics. You can call if you like and I would be glad to explain the process for you.
Regardless what you do, since its a track bike, get some extra painy in case you need to do some touch up work later on.
Clear coat can also be included in the color coat to save you a step. I can also explain the advantages/disadvantages of each to you.
Drop me a PM with a contact method.
Ken
awesome! thanks!
__________________
SONG

2007 Kymco Grand Vista 250
2006 KTM 950 Supermoto
2001 Yamaha R1
1976 Honda CB360t
  Reply With Quote

Old 01-29-2007, 09:48 PM   #4
ronin_01r1
Throttle Lock
 
ronin_01r1's Avatar
 
ronin_01r1 is offline
Join Date: Jun 2005
Location: south jersey
Posts: 1,105
Default

so i found another one...this time on the r1 board.
http://www.r1-forum.com/forums/showt...ighlight=paint

this sounds more complicated. i'm looking for the KISS method...


Heres a few tips, if anyone else has anything to add feel free Im sure I forgot something!

Ive been getting a lot of PM's with members wanting to know how to paint their own bikes. First you will need a COMPRESSOR. Heres a link to a decent Compressor that will work ok. This is a budget Compressor and will work for small parts. If you have extra $$ get a bigger one.

http://www.harborfreight.com/cpi/cta...emnumber=47065
Next you will need a decent HVLP gun. This is the one Ive used and it works great for the price. Good starter gun.

http://www.harborfreight.com/cpi/cta...emnumber=47016
Next you will need a good filter system to get clean DRY air. Heres the one that I use.

http://www.harborfreight.com/cpi/cta...temnumber=1118
Ok now its time to buy some material. You will need a good pre cleaner. You can buy this at autozone. Its also called a grease and wax remover. Its about 3.00 a can, one can should be enough. You will also need some rags. Now its time to buy some paint. Heres a link to the place where I buy my House of Kolor. You can use any kind of paint you wish but Ive found that HOK is easy to work with and easy to mix.
http://www.autobodysupply.net/houseofcolor/houseof.htm
First you will need to shop for a good primer.
http://www.autobodysupply.net/catalo...CategoryID=436
Then a sealer
(use the same link above)
Now time to think about a color. It is important to use a primer/sealer that is close to your base color you pick. Stay away from kandies they are pretty hard to learn and are not for the first timer.
Now shop for some clear. I use UC35
http://www.autobodysupply.net/catalo...CategoryID=433
It tells you the mixing ratio in the link that you will need Reducer and hardner. You will also need Reducer for your base. You can use the same reducer for clear and reducer. When shopping for Reducer it comes in 310 311 and 312. 310 is for about 50' 311 is for 70' and 312 is for anything above that. Most HOK paint is 2 to 1 mixing. Now if you want to paint a few colors and lines on you fairings you need to but fine line tape and masking tape. Its in this linkabout 3/4 of the way down the page.

When you order the paint ask for tech sheets on the products your buying. This will tell you the mixing ratios. Aslo ask for paint mixing cups.
You will also need tack rags. You can buy these at Home depot or autozone for 1.00 each. Three should be fine. Next pick up some sand paper, you will need about five sheets of 400 and about five sheets of 1500. Lets get started!Wash your parts with some dish soap let dry and Spray the pre clean on the parts before sanding and try to wipe off before it drys, do one part at a time. Then get some 400 grit wet sand paper sand all your parts. Make sure they are all dull and have no shine left on them!Once done with that wash your parts really well with some dish soap! Once dry spray the precleaner on them and wipe clean again! Then get one of your tack rags and go over all the parts, this should remove lint ect. Now mix up your primer, shoot your primer. Stay about six inches away from the parts. Give it a med coat. Let flash dry for about five min. Then hit it again. clean your gun out really good with thinner. Once the primer is dry wet sand with 400 wet again. Try not to sand through the primer, were just trying to smooth it out! Once done wash the parts again let dry and hit it with precleaner. Now apply your sealer the same way as the primer. Let dry and make sure its flat and smooth. Now its time for the base. Tack rag the parts again and mix up your base Apply just enough base to cover and thats it! Dont over apply it! Also dont get in over your head! Only do parts that you know you can clear within 24hrs. Because after 24hrs. You have to scuff your base and reshoot your base then clear. Now that your base is down after about 15min you can shoot the clear. Clean your gun of base really well! Mix up your clear and shoot your parts. Apply a thin coat of clear to your parts. Let flash for about five min. and hit it with a med coat. Let flash for five to ten min. now hit it with a med/heavy coat. Your parts will be dry within eight hours at 70' and ready to wet sand out that orange peel (if you have any) . This is where it gets tough! Take your 1500 and get a bowl and put a drop of dish soap and the rest water so your sand paper doesnt bite. Sand all your parts untill all the shine is gone. Yes this is a LOT of work! AND STAY AWAY FROM THE EDGES!!!!! again do not sand the edges!! Take great care or you will sand through the clear and hit your base and fug up your whole job!! Once the parts are sanded with 1500 they will look really dull! You will think that there is no way in hell they will shine. Dont worry! Get some rubbing compound and buff the parts. They will start to shine but this isnt the end. Wash the compound off really good! Now polish the parts with 3m glaze. You will be amazed at the shine! Thats it your done!!! Im sure many of you will still have questions feel free to contact me with them. Ill try and help! Good luck and have fun! Oh yeah DONT FORGET YOUR MASK!!! This stuff can fug you up!
__________________
SONG

2007 Kymco Grand Vista 250
2006 KTM 950 Supermoto
2001 Yamaha R1
1976 Honda CB360t
  Reply With Quote

Old 01-29-2007, 10:33 PM   #5
NYCSTRIPES
Meatball's Daddy
 
NYCSTRIPES's Avatar
 
NYCSTRIPES is offline
Join Date: Oct 2005
Location: Queens, NY
Posts: 1,754
Default

check your PM's
Ken
__________________
2003 TL1000R #489
1998 Valkyrie cruiser

No man's life, liberty, or property are safe while the legislature is in session....-Mark Twain
  Reply With Quote

Old 01-29-2007, 10:38 PM   #6
Kennedy
Cake Cop
 
Kennedy's Avatar
 
Kennedy is offline
Join Date: May 2005
Location: Central NJ
Posts: 2,042
Send a message via AIM to Kennedy
Default

Hey I saw your post over on r1- FORUMS and I figured you could use some color ideas


__________________
Christopher


THE WICKED FLEE WHEN NO MAN PURSUETH BUT THE RIGHTEOUS ARE BOLD AS A LION
  Reply With Quote

Old 01-29-2007, 10:40 PM   #7
CBRBob
A 37 Production
 
CBRBob's Avatar
 
CBRBob is offline
Join Date: Jun 2005
Location: Central NJ
Posts: 4,347
Default

__________________
CBR Bob
TPM Certified Coach#29
TeamPromotion
Rider Ed. of N.J. Inc. Senior RiderCoach and Site Coordinator @CCM & RVCC
RiderEd of NJ Inc.

Cakes206:fuck the devils
  Reply With Quote

Old 01-29-2007, 10:43 PM   #8
Kennedy
Cake Cop
 
Kennedy's Avatar
 
Kennedy is offline
Join Date: May 2005
Location: Central NJ
Posts: 2,042
Send a message via AIM to Kennedy
Default


Doesn't look too bad
__________________
Christopher


THE WICKED FLEE WHEN NO MAN PURSUETH BUT THE RIGHTEOUS ARE BOLD AS A LION
  Reply With Quote

Old 01-29-2007, 10:46 PM   #9
CBRBob
A 37 Production
 
CBRBob's Avatar
 
CBRBob is offline
Join Date: Jun 2005
Location: Central NJ
Posts: 4,347
Default

__________________
CBR Bob
TPM Certified Coach#29
TeamPromotion
Rider Ed. of N.J. Inc. Senior RiderCoach and Site Coordinator @CCM & RVCC
RiderEd of NJ Inc.

Cakes206:fuck the devils
  Reply With Quote

Old 01-30-2007, 09:15 AM   #10
ronin_01r1
Throttle Lock
 
ronin_01r1's Avatar
 
ronin_01r1 is offline
Join Date: Jun 2005
Location: south jersey
Posts: 1,105
Default

Quote:
Originally Posted by Kennedy View Post
Hey I saw your post over on r1- FORUMS and I figured you could use some color ideas


hahah... nice. now, where do i get hot pink paint?

__________________
SONG

2007 Kymco Grand Vista 250
2006 KTM 950 Supermoto
2001 Yamaha R1
1976 Honda CB360t
  Reply With Quote

Old 10-22-2007, 06:01 PM   #11
Surfinglbi23
Squid
 
Surfinglbi23's Avatar
 
Surfinglbi23 is offline
Join Date: Mar 2007
Posts: 84
Default

That pink R1 is sweet!
__________________
--Tyler--

2001 R1 Track. Hot bodies quick release bodywork, Akrapovic Full system w/ custom shortie can, Stainless lines, racetech fork internals, Elka rear shock, Vortec threaded gas cap, Vortec clipons, Custom adjustable rearsets, Scotts/Ohlins Damper, Vesrah SRJL pads.

1995 Ducati Monster M900 Street

1999 Yamaha Zuma

Whole bunch of 2 stroke MX bikes
  Reply With Quote
Reply


Currently Active Users Viewing This Thread: 1 (0 members and 1 guests)
 

Posting Rules
You may not post new threads
You may not post replies
You may not post attachments
You may not edit your posts

BB code is On
Smilies are On
[IMG] code is On
HTML code is Off

Forum Jump


All times are GMT -4. The time now is 11:02 PM.
 

vBulletin skin developed by: eXtremepixels
Powered by vBulletin® Version 3.8.2
Copyright ©2000 - 2024, Jelsoft Enterprises Ltd.